In this post, I'll go over setting up Two-Factor Authentication for an Amazon account. If you want more information about Two-Factor Authentication and an app recommendation, see my post on the topic HERE. If you're ready to get started, then let's go!
As I've said before, this is not meant to be an in-depth guide, but more of a how-to for those that wouldn't normally think of turning on additional security settings. With that, let's get started:
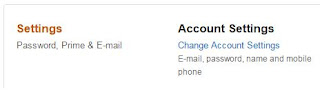
1) Go to Your Account in the upper right, and fine Account Settings toward the bottom of the page:
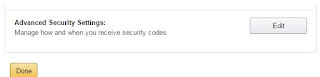
2) Next you should see an option for Advanced Security Settings, select the Edit button:
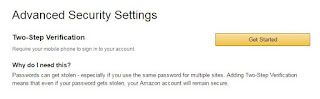
3) On the next page you should have the open to turn on Two-Step Verification. Select the Get Started button to turn this on.
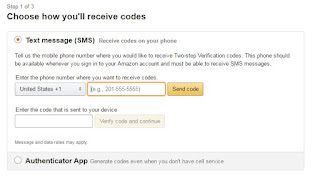
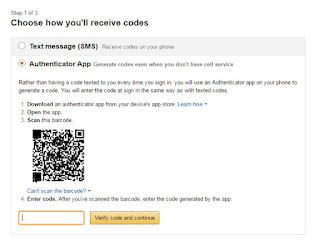
4.1) On the next page you'll have the option to either use SMS messaging or an authenticatior app. If you went through my post on 2-factor for all and installed the DUO Mobile app on your device, skip down to the next step. If not, then enter your mobile number and select the "Send code" button. Within minutes, you should get a code in your SMS app. Enter that code and select the "verify code and continue" button.
4.2) If you have the DUO Mobile app on your device, select the Authenticator App radial button and go into the app on your device. Select the key with a plus (+) icon in the upper right corner and aim your camera at the QR code that now appears on your screen. Select the Key icon next to your Amazon account and enter the code provided.
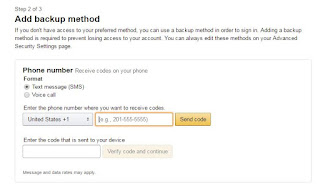
5) Next, you will be asked to enter a backup phone number. In my case, I used a separate phone and number that I have available.
6) After entering that last code, you should be presented with a wonderful Success message.

And that's it! Next time you log into Amazon on a non-trusted device, you should be asked for a code either from the authenticator app or from your SMS.
As I've said before, this is not meant to be an in-depth guide, but more of a how-to for those that wouldn't normally think of turning on additional security settings. With that, let's get started:
1) Go to Your Account in the upper right, and fine Account Settings toward the bottom of the page:

2) Next you should see an option for Advanced Security Settings, select the Edit button:

3) On the next page you should have the open to turn on Two-Step Verification. Select the Get Started button to turn this on.

4.1) On the next page you'll have the option to either use SMS messaging or an authenticatior app. If you went through my post on 2-factor for all and installed the DUO Mobile app on your device, skip down to the next step. If not, then enter your mobile number and select the "Send code" button. Within minutes, you should get a code in your SMS app. Enter that code and select the "verify code and continue" button.

4.2) If you have the DUO Mobile app on your device, select the Authenticator App radial button and go into the app on your device. Select the key with a plus (+) icon in the upper right corner and aim your camera at the QR code that now appears on your screen. Select the Key icon next to your Amazon account and enter the code provided.

5) Next, you will be asked to enter a backup phone number. In my case, I used a separate phone and number that I have available.

6) After entering that last code, you should be presented with a wonderful Success message.

And that's it! Next time you log into Amazon on a non-trusted device, you should be asked for a code either from the authenticator app or from your SMS.
Comments
Post a Comment