Recently, I upgraded my phone to the Samsung Galaxy Note 10+... I'm a big fan of big phones (a perk to being a big guy). I've always been intrigued with the idea of using one device for everything. Well, with the Samsung Dex application that comes built into these next gen phones, it might be possible...?
As a guy that spends a lot of time working on ARM Templates and PowerShell scripts for Azure management, I was curious to see if I could get my phone, using Dex, connected to my Azure DevOps environment and start working with repos.... Well, to my surprise, I was able to, and without much pain. So, in this post, I'll run through how I got my Dex environment setup and working with Azure DevOps Repos.
Getting Started
With Samsung Dex
open, go to the Google Play store and install Termux (https://play.google.com/store/apps/details?id=com.termux&hl=en_US)

Once that's
installed, open it!
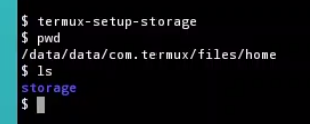
Next, we need to
gift Termux with permissions to access the phone's local storage. This can be
done by executing the command "termux-setup-storage" and clicking the
"Allow" button

This will setup a
"storage" folder under the termux home directory
Next, let's install
some updates with "apt update && apt upgrade"
After that
completes, run "apt install git" to install the git cli

Well, with Git
installed, we can start pulling code. Personally, I prefer to use Azure DevOps
for my code repository when I'm just working on things I'd prefer to keep
private. If I ever come up with anything good, I would share it out on Github.
But when I'm just messing around and I want a remote place to store my code, AzDO is the place I go. I'll likely cover
how to connect this Dex environment to Github at a later date…. At any rate,
here's how I was able to access my Azure DevOps repositories.
Azure DevOps Setup
In Azure DevOps,
navigate to the User icon > Alternative Credentials

Under the
Alternative Credentials section, enter an alternative user name and password

With this in play,
navigate to the repository you want to clone and copy the clone URL. Back in
Termux Enter the following:
$git clone
***Note; to paste in
Termux use Ctrl-Alt-V
BEFORE you hit
enter, move your cursor to the front of the URL, right after the https:// and
add the user name you just set as the "secondary" account. The full
command will look something like this:
$git clone https://USERNAME@dev.azure.com/ORGANIZATION/PROJECT/_git/
As you can see in
the pic below, your prompted for the account password, and the repo is
successfully cloned. I'm also able to show the remote repo using the "git
remote -v" command…

So, to wrap things
up for this post, using Samsung Dex, we've set up the Termux terminal
application, installed git, and got it connected to an Azure DevOps repo. In
the future, I'll explore how to set this up with SSH credentials, which I think
will need to be the method used for Github. However, my experience with doing
that is a bit limited… So that setup may take a while.
Next time around,
we'll explore some code editor applications and give a few reviews around which
ones I think would be useful.
Comments
Post a Comment