Windows 10, so far, not that bad. I'll do some reviews of it in the very near future. But since my previous post on configuring privacy settings during the setup of Windows 10 (found HERE), I've had a few people ask me, "Well, what if I used the Express Settings when I installed Windows 10?" My response, that's an easy fix. I'll quickly run through the changes that you'll need to make if you don't want to share things like you internet to spread updates, or WiFi passwords to you contacts, etc. So, here we go...
Privacy Settings
Most everything can be changed in the new Settings app, under the Privacy section. Let's take a look at whats there:
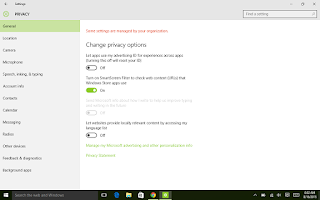 General Settings
Under the General section, you have the option to change things like letting apps use you ID for a 'universal experience' and providing information for targeted advertising. You also have the Smart Screen Filter there in between the two. As you can see from my screen shot, I have the ID sharing and personalized ads turned off.
Location Settings
 Location, here you can turn on or off the ability to provide your location history. Now, if this were my phone, I might have this on. Why is that? Well because I will use my GPS from time to time to go somewhere. I don't typically have Google Maps up on my computer for turn by turn directions... That's what the phone is for... My computer, however, doesn't need to know my location...
Camera, Microphone and Speach Settings
Camera, Microphone, and Speach, ink and typing don't really have much there. You can tell Windows to either allow or not allow apps to use your camera or microphone. I suppose, if you use Skype (or any other communications app) turning these off would be a bad idea. However, in these settings, you can disable apps from using these. This is something that you should probabay review from time to time. Just to make sure some app isn't using your camera when you don't want it too.
Account Info, Contacts, Calendar, Messaging and Radios
Account Info, Contacts, Calendar, Messaging, Radios and Other Devices all provide different functionality to apps. I'd say, personally, that it would be okay to leave these on. Really, you're just providing access to these items to apps that will be able to use them. I kind of want the email app to access my contacts, and the calendar app to access my personal calendar. I would suggest that you review Other Devices from time to time just to make sure something doesn't just slip in. If you have an Xbox One or smart TV, you will probably add those in the future.
Feedback Settings
 Feedback settings; here you can choose if you want Microsoft to ask for your feedback. I turned this off. If I want to give them my feedback, I'll send an email...
You also have the option to send diagnostic data and usage information. If they didn't include usage info, I'd be fine with this. Since they did, I turned it to basic. I'm sure there is a registry key to turn this off, but I'm still digging for it. I'm not overly fond of sharing how I use my computer with anyone, let alone Microsoft.
Background Apps
The final section here, Background apps. This is another one to review from time to time to turn off anything you don't want to run int he background. I'd say, most people won't mind having Facebook, Twitter, or a news app running to provide the latest updates. But something may slip in that doesn't need to be there.
Update Settings
Now, lets look at how to change the pesky update sharing settings. These can be found in the Settings app, under Update & Security. On the first page, Windows Update, you should seen an Advanced Options button. Go ahead and click on it.
 Here you can change whether or not updates are automagically installed or if you want to be notified to restart your computer. Because I don't like it when my computer randomly restarts on me, I changed this to Notify for a restart (more of a personal preference).
You will also see an option that says 'Choose how updates are delivered'. Go ahead and click on that one too.
 Now, you can choose if you want to share your updates with people over the internet and/or on your local network. It seems like Microsoft is trying to create a huge torrent network to provide updates to people without having their systems do all the work. And overall just feels like a bad. I don't like knowing that Microsoft is using the internet connection that I pay for to distribute updates to everyone else. I'd say just turn this one off.
Wi-Fi Since
Finally, let's kill off WiFi since. Why you may ask? Because Microsoft will store all of your WiFi passwords in a database somewhere on the internet. Something that is a huge target for hackers and could be breached at any time. Here's how it's done. In the Settings app go to Network & Internet, then scroll down until you see an option to Manage WiFi Settings.
 From here you can turn off the option to 'connect to suggested open hotspots' and 'connect to networks shared by my contacts'. It's funny that these are even on by using default settings when Windows displays a warning "Remember, not all Wi-Fi networks are secure." Good one Microsoft. Enable a non-secure setting for everyone.
Well, that *should* do it for now. I'll update this post if I come across anything else that is concerning with the various settings on Windows 10. Thanks for reading and good luck.
Privacy Settings
Most everything can be changed in the new Settings app, under the Privacy section. Let's take a look at whats there:
 General Settings
Under the General section, you have the option to change things like letting apps use you ID for a 'universal experience' and providing information for targeted advertising. You also have the Smart Screen Filter there in between the two. As you can see from my screen shot, I have the ID sharing and personalized ads turned off.
Location Settings

Camera, Microphone and Speach Settings
Camera, Microphone, and Speach, ink and typing don't really have much there. You can tell Windows to either allow or not allow apps to use your camera or microphone. I suppose, if you use Skype (or any other communications app) turning these off would be a bad idea. However, in these settings, you can disable apps from using these. This is something that you should probabay review from time to time. Just to make sure some app isn't using your camera when you don't want it too.
Account Info, Contacts, Calendar, Messaging and Radios
Account Info, Contacts, Calendar, Messaging, Radios and Other Devices all provide different functionality to apps. I'd say, personally, that it would be okay to leave these on. Really, you're just providing access to these items to apps that will be able to use them. I kind of want the email app to access my contacts, and the calendar app to access my personal calendar. I would suggest that you review Other Devices from time to time just to make sure something doesn't just slip in. If you have an Xbox One or smart TV, you will probably add those in the future.
Feedback Settings

You also have the option to send diagnostic data and usage information. If they didn't include usage info, I'd be fine with this. Since they did, I turned it to basic. I'm sure there is a registry key to turn this off, but I'm still digging for it. I'm not overly fond of sharing how I use my computer with anyone, let alone Microsoft.
Background Apps
The final section here, Background apps. This is another one to review from time to time to turn off anything you don't want to run int he background. I'd say, most people won't mind having Facebook, Twitter, or a news app running to provide the latest updates. But something may slip in that doesn't need to be there.
Update Settings
Now, lets look at how to change the pesky update sharing settings. These can be found in the Settings app, under Update & Security. On the first page, Windows Update, you should seen an Advanced Options button. Go ahead and click on it.

You will also see an option that says 'Choose how updates are delivered'. Go ahead and click on that one too.

Wi-Fi Since
Finally, let's kill off WiFi since. Why you may ask? Because Microsoft will store all of your WiFi passwords in a database somewhere on the internet. Something that is a huge target for hackers and could be breached at any time. Here's how it's done. In the Settings app go to Network & Internet, then scroll down until you see an option to Manage WiFi Settings.

Well, that *should* do it for now. I'll update this post if I come across anything else that is concerning with the various settings on Windows 10. Thanks for reading and good luck.
Comments
Post a Comment